Posts

Showing posts from October, 2019

How to get Intimate Ambiance on Vocals⁠

Image
A plugin like Abbey Road Chambers offers lots of small spaces. You can use H-Delay or any other delay plugin to set up a slap delay to create a subtle atmospheric feel on your vocal tracks.⁠ ---------------- Source: https://www.masteringthemix.com/

5 Mastering Tips & Tricks

Image
5 Mastering Tips And Tricks • Release On Limiter - If you’re trying to get your track sounding really loud, it might start to get crunchy. Try increasing the length of the release on the limiter to lessen this distortion.You could also try increasing the attack. By increasing the attack you might start affecting the punch of your music so make conscious and informed decisions when playing with the settings. Dynamic Phase On Multi Band Compressor - A multi band compressor can induce phase shift and pre-ringing as it uses filters to split the audio into the separate bands. A dynamic phase or linear phase setting will minimise these sonic issues. • Bass Space - Use the Bass Space feature in LEVELS to make sure there are no unnecessary low end frequencies in channels other than your kick and bass. This will help you get punchy, rich and clear lows in your master. • Harshness Control - Brainworx Bx_ Refinement is an awesome tool that subtly removes the harshness from audio. I

Upward Expansion when you feel your track just isn't punchy enough after mastering

Image
Clinically precise upward expansion- So what exactly is expansion? Think of expansion as the opposite of compression. There are a few different types of dynamic processing but let’s keep it simple for now and say: Compression decreases the volume of the louder elements, whereas Expansion increases the volume of the louder elements. Expansion is particularly useful when you feel your track just isn't punchy enough after mastering. ---------------- Source: https://www.masteringthemix.com/

Push the Channel Further Back in the Mix by Transient Designer

Image
Sometimes a channel can stick out of the mix a little too much. A volume adjustment is just one approach, you could also reduce the transient volume to keep the body of the sound the same volume whilst pushing the channel further back in the mix. ------------------ Source: https://www.masteringthemix.com/

Compressor Settings

Image
These compressor settings will give you a ballpark idea of where to start. Fine tune from here to get the settings working perfectly with your audio. ----------- Source: https://www.masteringthemix.com/

EQ Frequency Cheat Sheet

Image
EQ Frequency Cheat Sheet Source: https://www.masteringthemix.com/

When Transients are Poking Through The Mix a Little Too Much

Image
When your transients are poking through the mix a little too much, try blunting them with a compressor. Dial in a high ratio (8:1 is good) then set the threshold to only work on your transients. The result can give your transients serious body and whack. --------------- Source: https://www.masteringthemix.com/

Reverb Perception: Via Headphones vs Via Monitors

Image
Our brains process sound differently when it's presented through monitors vs headphones. When we listen through monitors the sound bounces around the room and our brains assume the reverb is generated by the space we're in, so we disregard the effect and perceive our mix to have less reverb. When listening through headphones we get the direct sound with no input from the space we're in, so the brain gets a clearer and unaltered sense of space in the mix. It's a good idea to jump between both monitors and headphones when dialling in reverb to get it sitting perfectly in your mix. ---------- Source: https://www.masteringthemix.com/

Adjust Attack and Release to Get VU Meter Dancing

Image
Tweak the attack and release settings on your compressor to get the VU meter dancing in time with your music. This can get your compressor pumping in time with your track and give a great vibe. -------------- Source: https://www.masteringthemix.com/

Reverb Ducking Technique

Image
From  @glisten.sound  ! This can really help decongest your mixes, and it also sounds awesome!

When a Mix or Channel is Sounding Muddy, Downward Expansion is an Effective Remedy

Image
Downward Expansion to Decongest a Mix: When a mix or channel is sounding muddy, downward expansion is an effective and musical remedy. Begin by selecting the problematic frequencies (around 150Hz-350Hz). Now set the threshold so the prominent parts of the audio are just reaching the threshold. The downward expansion will reduce the audio below the threshold, so it’s important to be purposeful with your placement. Set the down-ratio to around 3:1 to hear your audio begin to decongest. Adjust the attack and release to work with your audio. An EQ can do this job in a static way, but it also reduces the volume of any punchy elements in the ‘muddy’ range. Downward expansion lets you maintain the volume of the music you want to hear whilst reducing less important muddy sounds. ------------- Source: https://www.masteringthemix.com/

Automate Your Reverbs Wet Return To Enhance Your Mix!

Image
Automate your reverbs wet return to enhance your mix! Works great on delays too. ----- Source:  @echosoundsworks

Gated Reverb

Image
Gated reverb can help you add space to a channel whilst keeping your mix clean and decongested.

Try Adding A Formant Shift to Your Reverb

Image
It's this kind of unique approach that will give your mixes the edge. --------- Source:  @echosoundworks

ADSR Explained

Image
An excellent look at what an envelope does in a synth. It’s one of the most powerful sound design tools, you can completely change a sound by tweaking the ADSR. --------- Source: Cosmic Academy

Compression In Stages

Image
Making one compressor work too hard can give unnatural results. Using a couple compressors in serial with more subtle settings can be just what your music needs! Thanks to  @echosoundworks  for the awesome tip

Got a harsh Mix?

Image
Got a harsh Mix?  Simply cutting the high frequencies will affect the tonal balance of your whole mix. That might be necessary, but more often than not you only want to reduce the louder high-frequencies. For this task, a dynamic EQ is perfect. You can set the band of the high frequencies you want to reduce, then set the threshold so the reduction only happens when those high-frequencies are too loud in the mix.  ————— Source: https://www.masteringthemix.com/

Tip to make a channel to sound wide but balanced between both the left and right speakers

Image
In some circumstances, you’ll want a channel to sound wide but balanced between both the left and right speakers. To do this, you can double track audio and pan one left and one right by an equal amount. The most effective way to do this is to record two separate takes of audio, or if it’s a synth you can slightly alter the patch. If neither of those options is possible you can use EQ and effects to create a difference between the two channels. You could also use separate delays and reverbs on each channel to give each their own sense of time and space. Note: If you simply duplicate the channel and add no effects or alterations then the audio will sound like it’s coming from the phantom centre (not wide). ------------- Source: https://www.masteringthemix.com/

For Super Clean Mix: Mid/Side Frequency Specific Ducking to Avoid Masking.

Image
Mid/Side frequency specific ducking to avoid masking… for a super clean mix! - Instantiate a multi band compressor on the channel you wish to ‘duck’.  Set the sidechain to external and select the channel you want to trigger the ducking. - Create a band to cover the overlapping frequencies. - In Pro MB set the stereo link to MID and push the slider all the way to the right. - Set the ratio relative the amount of ducking you want. - Set the threshold to only duck when masking occurs. - Tweak the attack, release and look ahead settings to work with your audio. ----------------- Source: https://www.masteringthemix.com/

How To Fix A Harsh Sounding Mix or Frequencies

Image
How To Fix A Harsh Sounding Mix: The first step is to locate which channel or channels are causing the issue. In most cases, harshness is caused by just a couple of channels, so it’s not always a good idea to try and fix the problem on the master fader. Try muting a few usual suspects one by one until the harshness disappears. Mute the vocal, the hi-hats, the prominent synths, string parts or any other channels that you think might be making your mix sound harsh. When you’ve identified the trouble-maker, pull up a dynamic EQ and take a look at the frequency analyzer. As you can see in the example below, there is a clear build-up around 4kHz. That’s the area I want to ‘control’ rather than cut completely. ---------------------- Source: https://www.masteringthemix.com/

Choosing The Appropriate Compressor

Image
Different compressors have different flavours and characteristics. Knowing which one is perfect for the job at hand will help you get the best sound from your audio. ----------------- Source: https://www.masteringthemix.com/

How To Transparently Fix Resonance In A Mix

Image
How To Transparently Fix Resonance In A Mix: A resonance might only come into the mix at a certain point depending on the musical note, so you don’t want to statically cut the frequency. A dynamic EQ will be triggered only when the resonance kicks in, leaving the rest of the performance with its original tonal balance. The trick here is to find the resonance and set the EQ band to 0dB. From that point, bring down the dynamic band with the thinnest possible Q so it’s focused on that specific frequency. Keep tweaking the dynamic gain reduction (keeping the main EQ at 0dB) until you feel like the resonance is under control. It’s important to use your ears to set the exact amount of reduction when fixing resonances. There is a point the resonance is controlled and it’s no longer a problem, reduce it further and you’ll find that the channel will sound thin. Some resonances are very subtle and only require adjustments of a few dB for the sound to be natural. ---------------------

Are you struggling to get your mixes sounding bright, wide, and loud?

Image
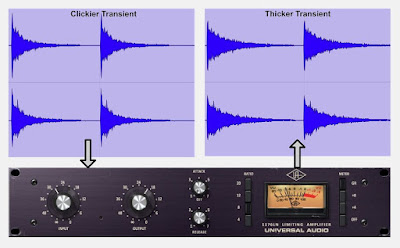
Are you struggling to get your mixes sounding bright, wide, and loud? Do you listen to pro mixes and wonder how they get the music jumping out of the speakers? There’s a common mistake that many producers make when trying to get their music sounding HUGE. I’ll be revealing the mistake in this blog post. Also, I’ll show you an approach to get your music sounding bigger than ever. The Mistake: Ignoring Contrast The mistake is trying to make the whole song as bright, wide, and powerful as possible. What happens when you do this…? If everything is mixed  bright , nothing sounds  bright . If everything is mixed  wide , nothing sounds  wide . If everything is mixed  powerful , nothing sounds  powerful . Our perceptions can be fooled by our frame of reference. Our ears are tuned to the context of what we have just heard. This affects our understanding of tonal balance. For example, if we listen to a mix with very piercing high frequencies and then to a well-balanced mix, w